
DIY: Make your own clutch
Hoy os enseño como hacer un clutch super sencillo! Prácticamente no tendréis que coser (salvo por la cremallera), porque el truco está en hacerlo con grapas!
Today I show you how to make a clutch super easy! Practically you will not have to sew (except for the zipper), because the trick is to do with staples!
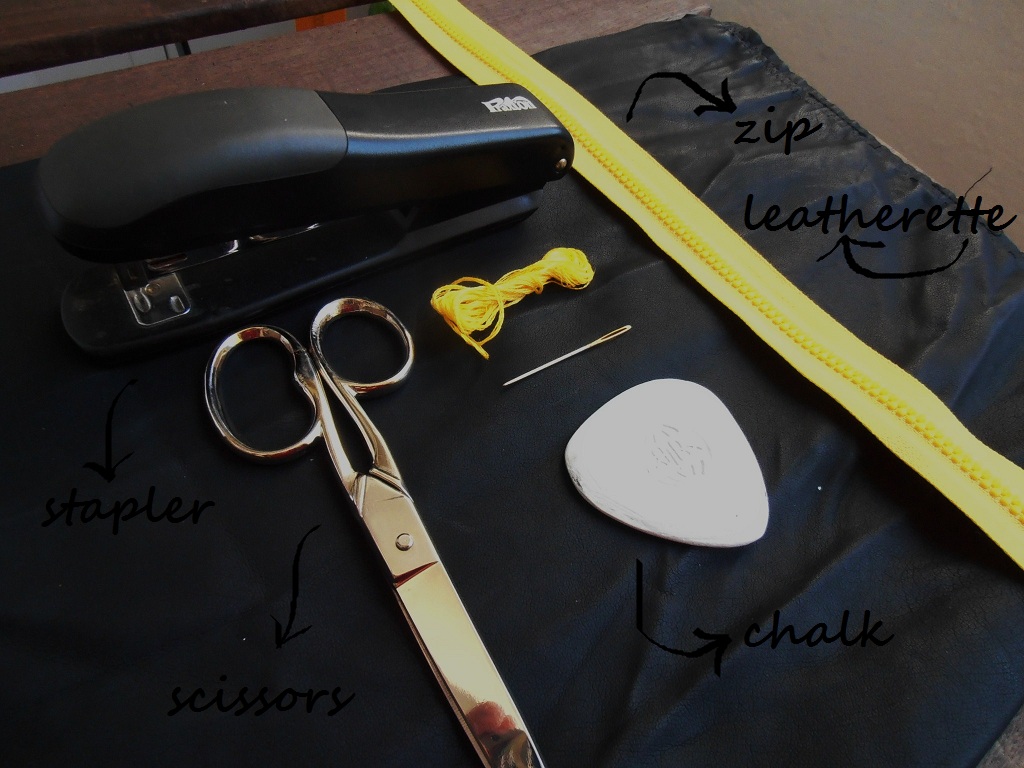
Necesitaremos: una grapadora, unas tijeras, hilo y aguja, una tiza para ropa, una cremallera y un trozo de polipiel rectangular.
Yo he decidido combinar el negro con un toque amarillo de la cremallera, pero siempre lo podéis adaptar a vuestro gusto.
We will need: a stapler, scissors, needle and thread, chalk for clothes, a zipper and a rectangular piece of synthetic leather.
I have decided to combine the black with a touch of yellow on the rack, but you can always adapt to your taste.

Primero giraremos el trozo de polipiel por la parte interior y lo doblaremos por la mitad y dibujaremos la forma de nuestro clutch para después cortarlo.
First we turn the piece of synthetic leather on the inside and it will fold in half and we will draw the shape of our clutch for then cut it.

Cortaremos la pieza que hemos dibujado dejando un margen de aproximadamente dos centímetros para cuando tengamos que unirlo.
We will cut the part that we have drawn with a margin of about two centimeters.

Colocaremos una hilera de grapas a lo largo de ambos lados de nuestro trozo de tela (recordad que teníamos un rectángulo doblado por la mitad que formaba un cuadrado). Si queréis reforzar el clutch podéis hacer una doble hilera de grapas.
Place a row of staples along both sides of our piece of synthetic leather (remember we had a rectangle folded in half forming a square). If you want to reinforce the clutch you can do a double row of staples.

Y cuando le demos la vuelta a lo que teníamos nos quedará una cosa así. Ahora solo queda ponerle la cremallera.
And when we turn around to what we had we will have a thing like this. Now we just have to put the zip.


Mediremos el largo del clutch y lo marcaremos en la cremallera para saber hasta donde tenemos que coser y el sobrante de la cremallera lo meteremos dentro del clutch.
We will measure the length of the clutch and mark it on the rack to know how far we have to sew and the remainder of the rack we will put it in the clutch.

Haremos unas pequeñas puntadas en las esquinas de los laterales para fijarlos y para hacer un pequeño doblez para que no se vea la tela cortada.
We will make a small stitch in the corners of the sides to fix them and make a small bend so you do not see the cut fabric.

Separaremos la cremallera y coseremos cada parte de la cremallera en cada lado del clutch.
And sew the zipper will separate each part of the rack on each side of the clutch.


Una vez hayamos cosidos toda la cremallera al clutch, fijaremos el final de la cremallera a la tela para que no se nos mueva.
Once you have sewn the zipper all the clutch, we will post the end of the zipper to the fabric so it does not move us.


Cortaremos los posibles sobrantes de cuando cosimos la cremallera y el restante de la tela de la cremallera podemos coserlo o cortarlo.
We will cut off possible surplus when the zipper and sewed the remaining fabric of the zipper can sew or cut.


Y este es el resultado final! Yo decidí colocar la cremallera por fuera y que se vea al completo, pero también podría haber optado por coser la cremallera por dentro, de modo que no se viera la costura. Espero que os haya gustado y que os animéis y me mandéis la foto por facebook AQUÍ!
And this is the end result! I decided to put the zipper on the outside and be seen at once, but could also have opted to sew the zipper on the inside, so you do not see the seam. I hope you liked it and that you feel encouraged and send me the picture for facebook HERE!
Ah, muy chulo DIY! Me gusta!
ResponderEliminarxoxo
B* a la Moda
Gracias B!
Eliminarxxx